The Zynk Program
Installing Zynk
Current Version
The current version of Zynk can be downloaded from http://zynk.com/download/
Zynk Archives
If you require a particular version of Zynk or are unable to upgrade to 2.0, please contact our support team at [email protected] who will be able to provide you with correct download link.
Managed Install
Contact your supplier to arrange for them to install or re-install Zynk, and test that your workflows run correctly. There is normally a one-off charge for this service.
Self Install
You can also choose to download and install Zynk yourself. If you encounter any problems we are happy to provide email support via [email protected] to help you troubleshoot any issues.
Note: We would recommend to run the installer as an Administrator.
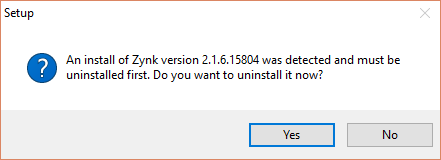
After downloading Zynk, run the Setup program. If you have previously have Zynk installed on your PC you may see the dialogue below, choose Yes to uninstall the old version and continue.
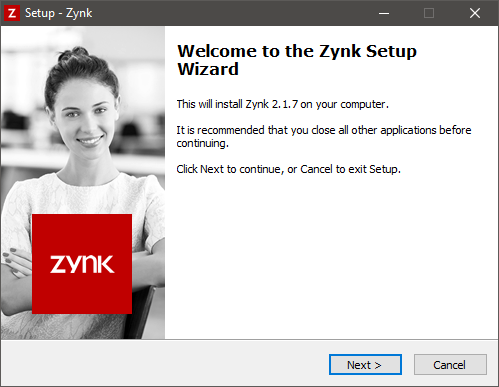
Click Next to continue with the install.
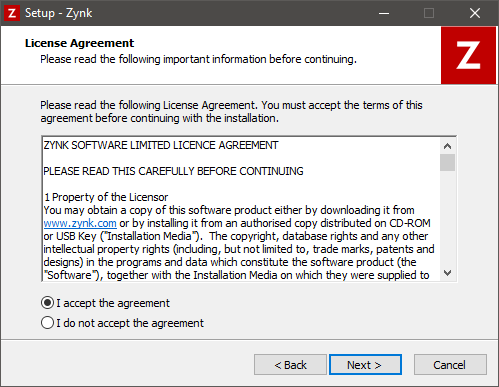
To continue with the installer you will to choose "I accept the agreement" Click Next to continue
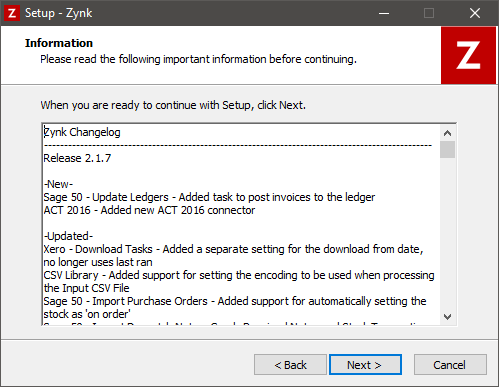
The Changelog allows you to see what is new in Zynk, any changes made to existing tasks and any issues that have been resolved. Click Next to continue.
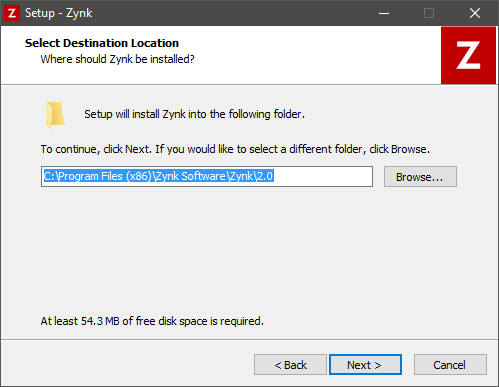
You can optionally change the install folder for Zynk using Browse Click Next to continue.
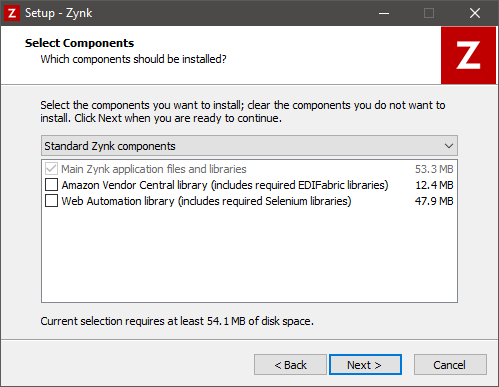
If required you can choose to install the Amazon Vendor Central library and the Web Automation task. The Main Zynk application files and libraries is required. Click Next to continue.
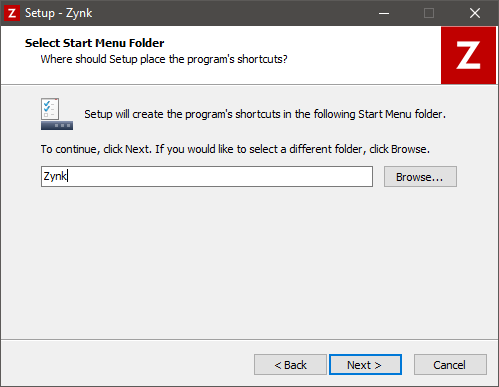
You can optionally change the folder name for the Start Menu Click Next to continue.
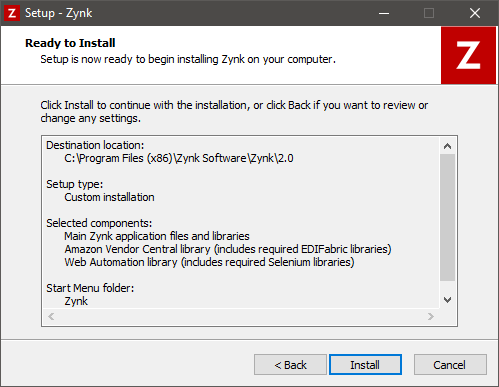
The overview screen shows the options you have chosen and where Zynk will be installed to. If you are happy to proceed click Install. The next screen will show you the installation process, and may prompt for you to confirm if you are happy to download and install required files.
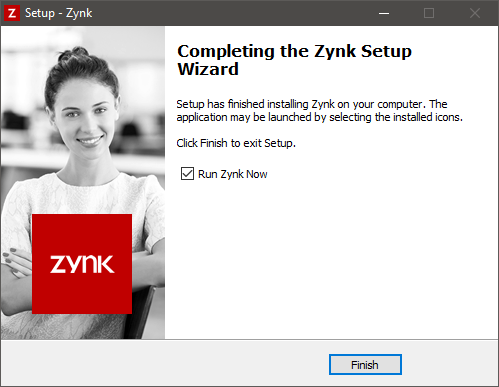
Once complete you should see the final screen of the installer. From here you can choose to run Zynk on click Finish.
Silent Installation
The Zynk can be installed silently by running setup.exe from the command line, and specifying one of the arguments below:
/SILENT- Installs the application without requiring any user interaction. Installation progress will be displayed in a window on the screen./VERYSILENT- Installs the application without requiring any user interaction, and without displaying any progress information on the screen.
For example, the command start /wait setup.exe /VERYSILENT will install Zynk completely silently and wait for the process to finish.
Activating Zynk Workflow
The first time you run Zynk you will need to activate your software with the Serial Number you were provided with when you purchased Zynk from your vendor.
The first dialogue prompt asks you to enter your Serial Number.
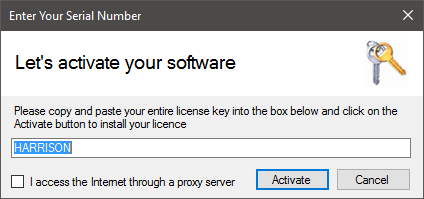
Click on the Activate button to activate Zynk.
Once your license key has been activated, Zynk will load. To view your license information, click Manage >> License to see all licensed components.
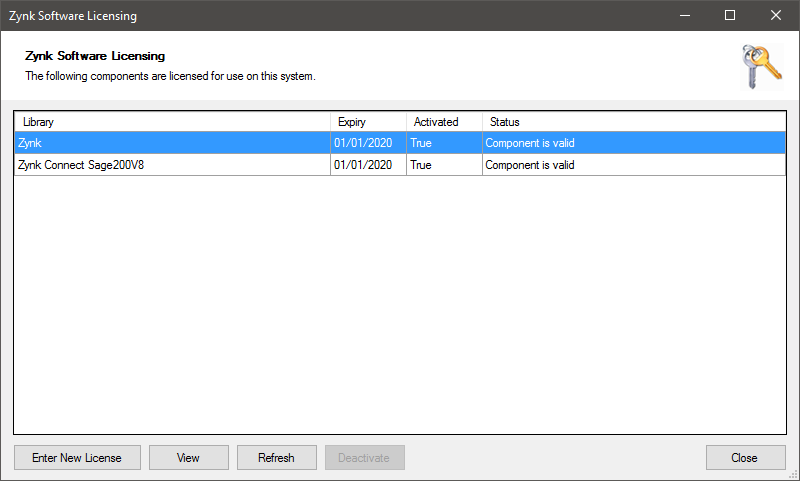
To see more information on a component license, click on the View button which will display more information.
Entering a New License
Click on the Enter New License button to enter a new license
Licensing Troubleshooting
When activating a valid Zynk license in versions prior to 2.20.3 you may come across the following message:
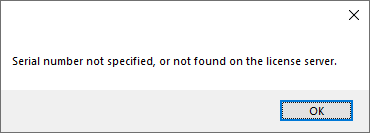
This can relate to an issue in older versions of Zynk where Zynk cannot create a secure connection to the Zynk licensing server using TLS 1.2.
To resolve this issue please download the following updated licensing library from http://downloads.zynk.com/files/Internetware.Licensing.dll
Once downloaded you can place the file in the installation folder for Zynk at C:\Program Files (x86)\Zynk Software\Zynk\2.0
If you are prompted to replace the file please do so. Once done restart Zynk and attempt to activate your license again.
Reinstalling Zynk
If you are moving Zynk from one machine to another, we advise keeping the to the same version as we often update/upgrade tasks to perform more reliably. To find your current version, go to Help > About within Zynk note down the Version number specified. Once you have the Version number, please email us at [email protected] and we will email you a link to the correct .exe file for re-install.
- The Zynk program data will need to be copied to the new server.
- Ensure the workflows are not currently running and are not scheduled to start until the migration is complete
Depending on the version of Windows you are running on this can be found in one of the following locations:
In Windows XP or earlier: C:\Documents and Settings\All Users\Application Data\Zynk Software\Zynk\2.0
In Windows Vista or Later: C:\ProgramData\Zynk Software\Zynk\3.0
After reinstalling, replace the newly created 2.0 folder with the data copied from your existing Zynk data directory.
When you are ready to start using Zynk you will need to access Zynk on the old machine and on the top bar select Manage --> License where you can deactivate the license from that machine for reactivation on the new installation. If you are unable to manually deactivate for any reason please contact [email protected] so we can do this for you.
Additionally, for connections that rely on a specific data path (For example, Sage 50 UK and US) these connections will need to be reconfigured to use the new data path.
Please note that if Zynk Software did not build the integration then you should contact your developers to ensure all data/files are copied from and to the relevant locations.
Updating Zynk
There are many cases where updating Zynk can be necessary.
This could be to take advantage of new features, to integrate with newly developed connectors or when critical security or function updates are needed.
Thankfully, this process is quite straightforward and can be carried out by any IT team and even most end users.
Before you Begin
- Make sure all workflows are disabled and not running.
More information on this can be found here: Workflow Schedules
- Make sure the Windows user you are logged in as has Administrator privileges.
- Optionally, you may wish to make a copy of your Zynk data before updating.
More information on this can be found here: Backing up Zynk
Updating The Program
- Download the latest version of Zynk from the following location: Zynk Download
- Once downloaded and you've made sure no workflows are running, run the installer
- You'll be provided with a few screens such as confirming the EULA, which can be navigated through by pressing 'Next' or 'OK'
- Zynk will install various components, including fetching some from our website to make sure everything is up to date.
- Once finished, you'll be asked if you'd like to run Zynk or not. We advise choosing Yes to this and opening the program.
- When Zynk opens, we advise making sure your workflows are visible in the left hand window, then clicking "Connections" at the top of the screen to make sure everything is still in place.
- Once things have been checked, simply reenable your workflows from the same window you disabled them before starting.
Frequently Asked Questions
Are there any other core components necessary for Zynk to work?
Zynk is a desktop application and as such, needs some Windows components to work correctly. These are included in the installer package
Will I need to restart my PC?
Most Zynk updates do not require a restart, but if upgrading from version 2022.11.1 or below, a restart may be needed. This is due to the inclusion of the Microsoft .NET Framework 4.8.
Zynk is asking me for login credentials that I haven't been provided?
If you are updating from an older version of Zynk, you may never have seen this screen before. The default credentials are admin as both the Username and Password.
More information on individual User Accounts can be found here: User Management
Workflows/Connections are missing?
If something goes wrong and you are unable to see your Workflows or Connections, please contact support at [email protected]
Can you upgrade my Zynk for me?
If you aren't comfortable updating Zynk for any reason, we can do this for you but it would be classed as a chargeable service as this is outside the bounds of the standard support agreement. If this is something you'd like to arrange, please contact [email protected]
Uninstalling Zynk
To uninstall Zynk from your machine click on Start menu and choose All Programs > Zynk > Uninstall Zynk
The program will ask you to confirm "Are you sure you want to completely remove Zynk and all of its components?" If you choose Yes all Zynk program files and components will be removed from your system.
Once the uninstall is completed, you will see the message "Zynk was successfully removed from your computer"
Workflows and Data Files
Please note that any files that you created or downloaded after Zynk was installed such as Workflows or data files will NOT be removed by the installer, in order to remove any data files that were created after the install you can manually remove them by deleting the directory. This functionality is by design and is intended to prevent accidental removal of customer created files during the uninstall process.
On Windows 10, Windows 2016 Server or later Remove the directory C:\ProgramData\Zynk Software\Zynk