Connecting to Xero
All of the tasks in the Xero connector require a connection to Xero, so you will need to create a connection with the type 'Xero (Private API, OAuth 2.0)'. See Managing Connections for instructions on creating a new connection.
Zynk connects to Xero using the private API, which requires you to set up a private application in Xero. See below for instructions on how to do this
Xero Private App Creation process
-
Login in to your developer account at https://developer.xero.com/myapps/
-
Click "New App" at the top right.

-
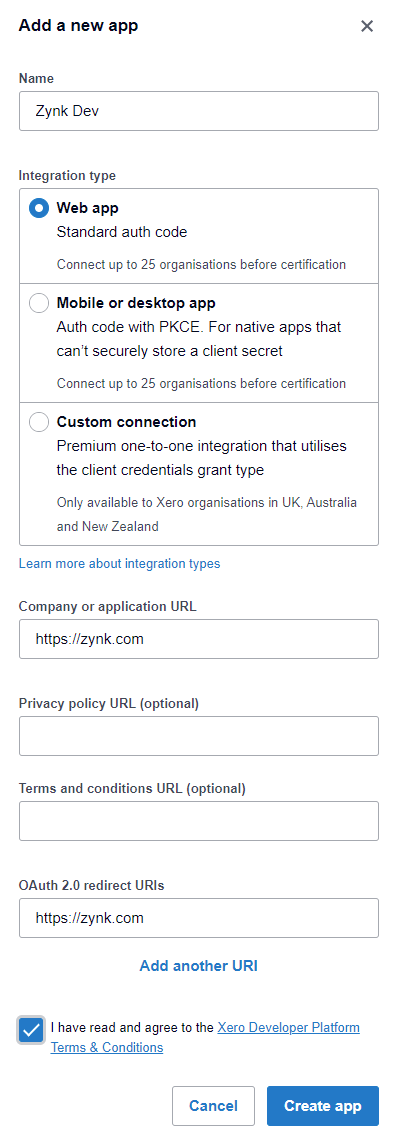
Enter a name for the application. This can be anything you like, such as 'Zynk Integration'.
-
For 'Integration Type', select Web app
-
For the 'Company or application URL', enter
https://zynk.com -
Leave the 'Privacy policy URL' empty.
-
For the 'OAuth 2.0 redirect URI', enter
https://zynk.com -
Click the 'Create app' button.

-
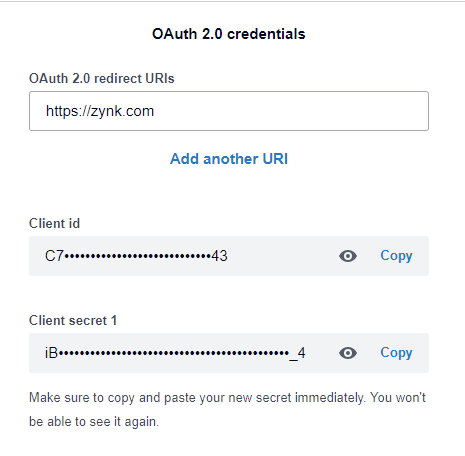
Click the Generate secret link. The generated client ID and secret will need to be copied to your Zynk connection.
Please note, this Client Secret can only be obtained at the point of generation. If this isn't copied at the time, an entirely new app will be required.
Further information can be found in Xero's Private Application Documentation.
Zynk Connection
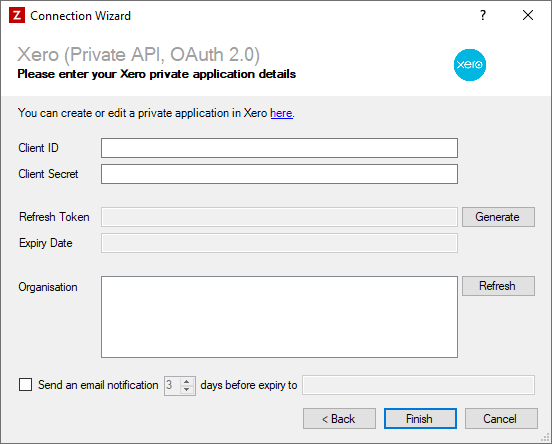
When creating a 'Xero (Private API, OAuth 2.0)' connection in Zynk, you will see a screen like the one below, requesting your Xero private application details:

Client ID
Required
Enter the client ID that Xero has generated for your private app.
Client Secret
Required
Enter the client secret that Xero has generated for your private app.
Refresh Token
Required
Click the Generate button, then log into Xero and approve access for Zynk.
Organisation
Required
After you've generated a refresh token, this list will display all the organisations your private app has access to. Select the organisation you want to connect to.
If you want to connect to multiple organisations, you will need to create a separate connection in Zynk for each one. When doing this, you can reuse the same private app by copying the client ID and secret you have already generated.
Expiry Notification Settings
Optional
Tick this box if you would like to receive an email notification shortly before the connection is due to expire. The following additional settings can be configured:
- You can change how much notice is given by altering the number of days. The default is 3, but you can specify any value between 1 and 10.
- The email address you would like the email to be sent to must be specified in the box at the end. You can also provide multiple email addresses to send the notification to, by separating them with commas.
When this option is enabled, Zynk will check the expiry date of the connection at the point of startup and will send a notification email if it falls within the number of days specified. The email will be sent using the SMTP details configured in Tools > Options > SMTP.