Send Integration Report
This task will generate a report based on the success and/or fail files from other tasks and send it via email. The report shows which records have been successfully processed, and which records have not been processed due to an error.
Settings
SMTP Connection
Required
The SMTP Connection to send the emails from. See the Connecting to an SMTP Server article here if you require more information on how to create/manage connections.
Attachments
Optional The file or list of files to be attached to the email. TIP:
You can use the output from a List Files task to set the list of attachments dynamically. Also, you can use wildcards to include a files matching a certain pattern in the working directory, e.g '*.csv'.
Please bear in mind the sending rules of your email provider, you may not be able to send all attachment types. If the attachment type is not recognised by your computer, it may not be displayed correctly in the email, if at all. Should this happen, Zynk will log a debug message detailing the file(s) affected.
Bcc
Optional
The address to send a Bcc (blind carbon copy) of the email to. You can specify a list of email addresses if you would like to send the same email to multiple recipients. A list can be provided either as a comma separated list, or by choosing the 'List' data type and entering each address separately.
Cc
Optional
The address to send a Cc (carbon copy) of the email to. You can specify a list of email addresses if you would like to send the same email to multiple recipients. A list can be provided either as a comma separated list, or by choosing the 'List' data type and entering each address separately.
From
Required
The email address you are sending emails from e.g. [email protected]
Note
If you are using the built-in Zynk SMTP connection, please be aware that the 'From' address will default to '[email protected]'. You can still set the name of the sender by using the 'Name' task setting.
Name
Optional
You can optionally include a name to send the email from, e.g Mr Person mr.person@mycompany.com.
Report Settings
Required
The settings for generating the report. See below for more details.
To
Required
The address you are sending the email to. You can specify a list of email addresses if you would like to send the same email to multiple recipients. A list can be provided either as a comma separated list, or by choosing the 'List' data type and entering each address separately.
Zynk Settings
Report Settings
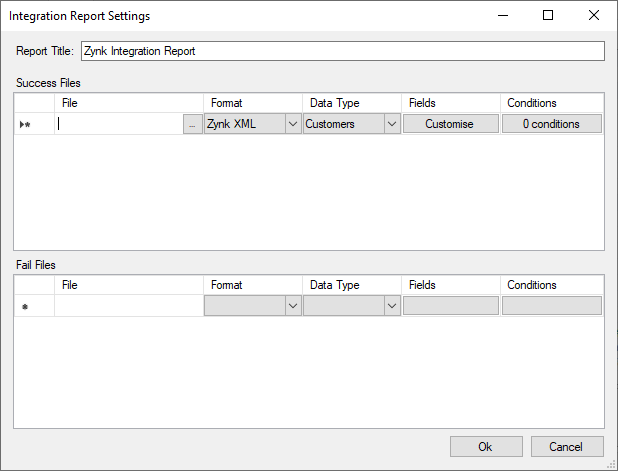
To configure the report, click on the ellipsis (...) button on the 'Report Settings' setting on this task. You will then see a window like the one below.

- Enter a title for the report in the 'Report Title' box.
- If you want to report on the successful import of records, enter the success file(s) from the appropriate task into the 'Success Files' section.
- Enter the file name into the 'File' column.
- If there a multiple files of the same file format and data type (see next step), you can optionally specify a file pattern to match, where the asterisk () is the wildcard character. For example, if there are multiple Sage 50 Import Invoice success files, you could use a file path of _sage_50_import_invoices_success.xml, assuming that all of the success files would end with a name _sage_50_import_invoices_success.xml
- Select the appropriate file format and data type from the drop down menus in the 'Format' and 'Data Type' columns. If you can't find your file format or data type, you can define the format yourself by following the instructions in the custom data types section below.
- You can optionally customise the fields that appear on the report by clicking the 'Customise' button in the 'Fields' column. Enter the field name as you would like it to appear on the report into the 'Field Name' column, and the XPath query to use to get the value into the 'XPath' column. Note that you must perform this step when using a custom data type.
- You can optionally specify conditions to filter out certain records from the report. See the conditions section below for more details.
- If you want to report on the records that failed to import, enter the fail file(s) from the appropriate task into the 'Fail Files' section.
- Enter the file name into the 'File' column.
- If there a multiple files of the same file format and data type (see next step), you can optionally specify a file pattern to match, where the asterisk () is the wildcard character. For example, if there are multiple Sage 50 Import Invoice fail files, you could use a file path of _sage_50_import_invoices_fail.xml, assuming that all of the fail files would end with a name _sage_50_import_invoices_fail.xml
- Select the appropriate file format and data type from the drop down menus in the 'Format' and 'Data Type' columns. If you can't find your file format or data type, you can define the format yourself by following the instructions in the custom data types section below.
- You can optionally customise the fields that appear on the report by clicking the 'Customise' button in the 'Fields' column. Enter the field name as you would like it to appear on the report into the 'Field Name' column, and the XPath query to use to get the value into the 'XPath' column. Note that you must perform this step when using a custom data type.
- You can optionally specify conditions to filter out certain records from the report. See the conditions section below for more details.
- Once you have added all of the success/fail files you want to report on, click the 'Ok' button.
Custom Data Types
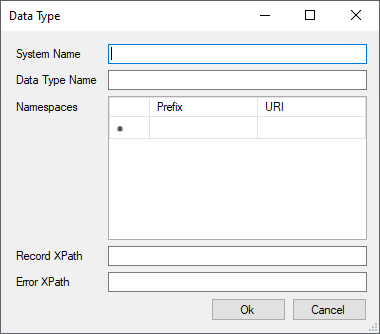
If the format or data type of a success or fail file you want to report on does not appear among the options that are available, you will need to define your own custom data type. To do this, select 'Custom' as the format, then click the 'Configure' button shown in the 'Data Type' column. You will see a screen appear like the one shown below.

- System Name - Enter the name of the system this file is being imported into, e.g.
Sage - Data Type Name - Enter the type of data this file contains, e.g.
Customers - Namespaces - If any of the XML elements or attributes you need to read from are declared within a namespace, enter the namespace prefix and URI in this table
- Record XPath - Enter the XPath query the task should use to get individual records from the file, e.g.
Customers/Customer. Remember to include the namespace prefixes you have declared in step 3 where appropriate, e.g.ns:Customers/ns:Customer. - Error XPath - Enter the XPath query the task should use to get error messages from a record, e.g.
Errors/Error/Message. Remember to include the namespace prefixes you have declared in step 3 where appropriate, e.g.ns:Errors/ns:Error/ns:Message. Note that this query must be relative to the record element, as returned by the Record XPath from step 4.
Conditions
You can optionally specify conditions to filter out certain records from the report. You can do this by clicking the 'Conditions' button. You will see a screen appear like the one shown below.

- Field - Select the field you want to filter on from the drop down. Note that you can only filter on fields that appear on the report. See the report settings section for details on how to customise the fields that are shown.
- Function - Select the comparison to perform between on the field's value from the drop down.
- Value - Enter the value to compare to.
- Operator - Select either 'And' or 'Or' from the drop down. Choosing 'And' will require records to meet all of the conditions specified in order to appear on the report. Choosing 'Or' will require records to meet at least one of the conditions specified in order to appear on the report.
Examples
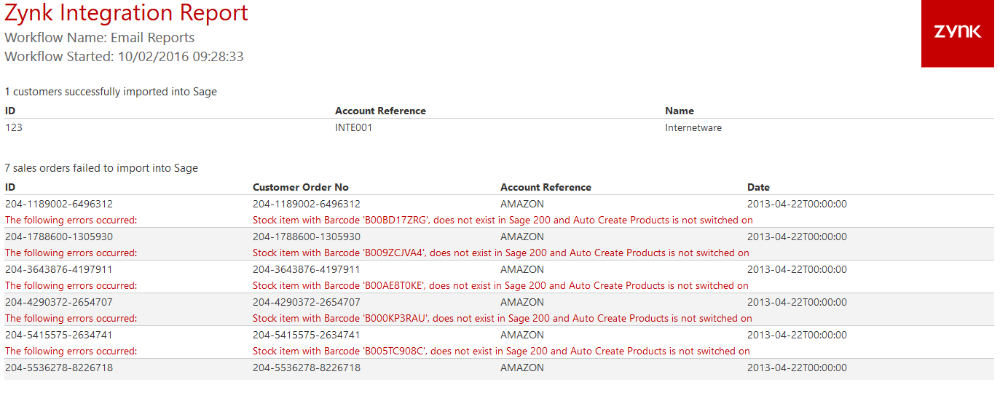
A sample report generated by the task is shown below.
