Converting XML files to CSV
This tutorial will help you to convert XML files to CSV format using the XML to CSV task in Zynk.
The XML to CSV Task
Most of the tasks within Zynk are set up to use standard XML as the input and output. In some cases, outside systems may require data in other formats (such as CSV). This tutorial demonstrates how to use this task by taking an example XML file and converting it to CSV.
XML to CSV
In this example, we will use the following example XML file:
<?xml version="1.0" encoding="utf-8"?>
<Company>
  <SalesOrders>
    <SalesOrder>
      <Id>12345</Id>
      <AccountReference>INTE001</AccountReference>
      <SalesOrderDate>2011-01-01T11:11:11</SalesOrderDate>
      <SalesOrderAddress>
        <Title>Mr</Title>
        <Forename>Test</Forename>
        <Surname>Person</Surname>
        <Address1>i6 Building</Address1>
        <Address2>6-8 Charlotte Square</Address2>
        <Town>Newcastle Upon Tyne</Town>
        <Postcode>NE1 4XF</Postcode>
        <County>County</County>
        <Country>GB</Country>
      </SalesOrderAddress>
      <SalesOrderItems>
        <Item>
          <Sku>TEST01</Sku>
          <QtyOrdered>1</QtyOrdered>
          <UnitPrice>200</UnitPrice>
        </Item>
        <Item>
          <Sku>TEST02</Sku>
          <QtyOrdered>1</QtyOrdered>
          <UnitPrice>200</UnitPrice>
        </Item>
      </SalesOrderItems>
    </SalesOrder>
  </SalesOrders>
</Company>
On this task you will see the following settings:
- Delimiter - The character to use to delimit the data in the CSV file. Usually this will be either a quotation mark or just left blank.
- Input File - The XML file to convert to CSV.
- Mapping Fields - This allows you to customise the way the XML is mapped into CSV format. See below for a full explanation.
- Output File - The name of the XML file to create containing the XML representation of the Excel worksheet
- Separator - The separator to use in the output CSV file. This will usually be a comma.
- XPath - The XPath query to find the data to output to the CSV file.
The Default Mapping
The default mapping will output the values of child nodes and attributes of the nodes returned by the XPath query. If we set the XPath query in the task settings to Company/SalesOrders/SalesOrder, the following output is produced:
Customising the Mapping
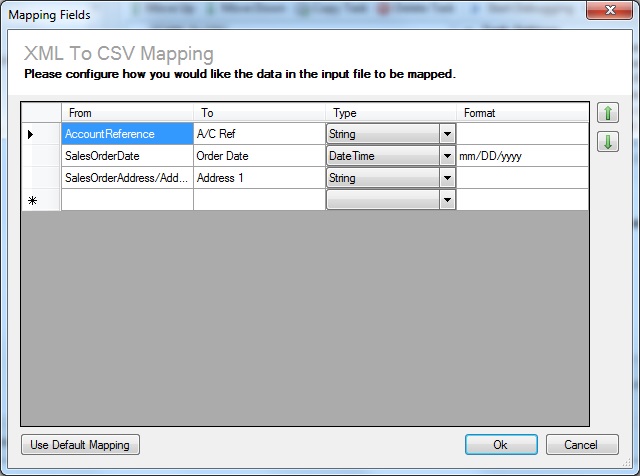
If the default mapping does not produce the results you require, a custom mapping can be created to output the data in a specific format. This is done using the Mapping fields setting on the task. When editing the Mapping Fields, you will see a window like the one below.

There are 4 columns, which are used as follows:
- From- The relative XPath query to get the required field. In the first row in the example above, if the XPath 'Company/SalesOrders/SalesOrder' was used in the task settings, the Company/SalesOrders/SalesOrder/AccountReference node will be returned for each SalesOrder node in the input file.
- To - The name of the field to output the result of the From query to. In the first row in the example above, the AccountReference field from the input file will be mapped to the 'A/C Ref' field in the output file.
- Type - The type of the data. In most cases 'String' will be an appropriate choice. This will treat the field as a piece of text and output it 'as is'.
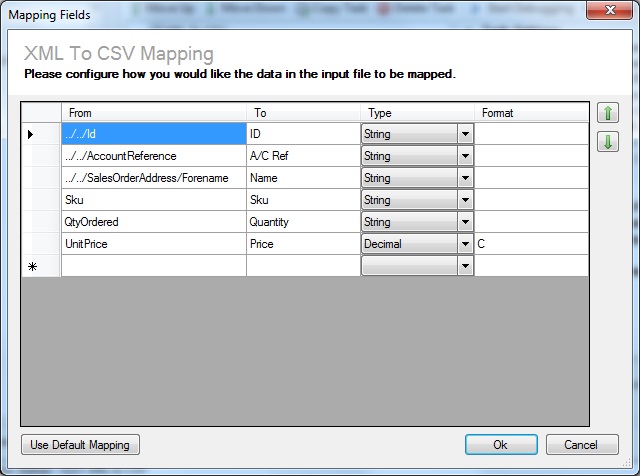
- Format - (Optional) The formatting to apply to the data. The result will depend on the data type selected. In the second row in the example above, a date is converted to the 'mm/DD/yyyy' format. In the example below, a 'C' is used on the last row to convert a decimal field into currency. For more information on formatting, see the links below:
- Numeric Formatting
- Date Time Formatting
The 'Use Default Mapping' button can be used to clear all the custom mapping settings and return to the default mapping, if required.
The fields will appear in the output file in the same order as they appear in the table. They can be reordered using the up/down buttons on the right.
The mapping shown will produce the following output:
Handling Hierarchical Data
When your XML file contains hierarchical data, you will need to 'flatten' this down in the output CSV file. In order to output each order item onto a separate line in the CSV file, the XPath query in the task settings will need to be set to 'Company/SalesOrders/SalesOrder/SalesOrderItems/Item'. You will then need to use a custom mapping to output the data correctly.

Notice how '../' is used in the XPath queries to move back to the parent node. This is required to access the Id, AccountReference and SalesOrderAddress, as they belong to a parent of the Item nodes. Taking the Id as an example, the query executed would be 'Company/SalesOrders/SalesOrder/SalesOrderItems/Item/../../Id'. The '../../' moves from the Item node back up to the SalesOrder node, which is where the Id is found.
The mapping shown will produce the following output:
ID,A/C Ref,Name,Sku,Quantity,Price
12345,INTE001,Test,TEST01,1,£200.00
12345,INTE001,Test,TEST02,1,£200.00
Using Predicates
Furthermore, you can use predicates to access specific nodes within the mapping. For example, say you have the below XML.
<?xml version="1.0" encoding="utf-8"?>
<Company
  xmlns:xsi="http://www.w3.org/2001/XMLSchema-instance"
  xmlns:xsd="http://www.w3.org/2001/XMLSchema">
  <Customers>
    <Customer>
      <AccountReference>A1D001</AccountReference>
      <CompanyName>A1 Design Services</CompanyName>
      <CustomFields>
        <CustomField>
          <Name>FIRST_INV_DATE</Name>
          <Value>02/01/2015 00:00:00</Value>
        </CustomField>
        <CustomField>
          <Name>LAST_INV_DATE</Name>
          <Value>15/03/2015 00:00:00</Value>
        </CustomField>
      </CustomFields>
    </Customer>
  </Customers>
</Company>
And you only wanted to retrieve the LAST_INV_DATE custom field, in your custom mapping you could use CustomFields/CustomField[Name='LAST_INV_DATE']/Value to retrieve the desired value.